TP-Link Router Login
When you feel your internet is running slowly, it’s probably due to your router settings, not your devices. TP-Link routers are popular worldwide due to their low prices, ease of installation, and sufficient power to stream, play games, work from home, and even support small office networks.
You can use a simple TP-Link WiFi router, a dual-band version to support more users, or a system like TP-Link Piso WiFi, but regardless, it all begins with the TP-Link login page.
Unless you ever log in to your TP-Link router, you are running your network with default settings!
Log In to a TP-Link Router
This is a step-by-step process for logging in to your TP-Link router.
First Step
Connect to the TP-Link Network using Wi-Fi and a LAN cable.
Second Step
Open your favourite browser, such as Google Chrome.
This does not require an internet connection; you are just connecting to the router’s local page, not a website.
Third Step
Click in the address box (where you would normally type the URL of a website) and key in one of the following;
- http://192.168.0.1
- http://192.168.1.1
- http://192.168.0.254
- Or: http://tplinkwifi.net
And press Enter.
Forth Step
Once the login page appears, you will find fields such as Username and Password.
Use the default username and password, respectively.
Fifth Step:
- After successful login, you will be redirected to the TP-Link administration dashboard.
- Depending on your model, you may observe:
- Basic tab of quick setup (WiFi name, WiFi password, internet status).
- A Pro tab with increased settings (firewall, parental controls, bandwidth control, VPN, etc.).
Sixth Step:
Each time you make changes:
Look for Save, Apply, or OK.
Certain modifications, such as the Wi-Fi password or SSID, may cause your router to reboot. That’s normal.

Default TP-Link Login Details
To make your TP Link login journey easier, here’s a quick reference table.
Usage (Approx.) | Default IP Address | Username | Password | When It Commonly Applies |
Very Common | admin | admin | Many home TP Link router models, older firmware | |
Very Common | admin | admin | Some newer fibre or high-speed router models | |
Common | 192.168.0.1 | admin | (blank) | Certain simplified TP-Link WiFi routers |
Less Common | admin | admin | Some extenders, repeaters, and older devices | |
Web Address | tplinkwifi.net | admin | admin | Models that prefer domain-based tplinkwifi login |
Related Router Login:
- This process is different from the Converge router login dashboard.
- For fiber configurations, check our PLDT router login guide.
How to Find Your Router's Correct IP Address
The default IP doesn’t always work! It could have been edited manually previously, or it may have been a custom setting offered by your ISP. In that instance, you can locate your TP-Link router’s IP address using the following methods.
Check the Router Label
Flip your router over or look at the back panel. There’s usually a sticker with information like: Model number, Default SSID, WiFi password, Default login IP address or web address, Default admin username/password
It is the quickest way to verify the correct address when logging in to tplinkwifi.net.
Use Windows (ipconfig)
- Press Windows + R, type cmd, and press Enter to open Command Prompt.
Type: ipconfig and press enter - Look for the section corresponding to your active network adapter.
- Find the line labelled Default Gateway! This is your router’s IP address, for example:
- 192.168.0.1
- 192.168.1.1
- 192.168.0.1
Use this IP in your browser to access the TP-Link login page.
Use macOS Network Settings
- Click the Apple menu → System Settings (or System Preferences).
- Go to Network.
- Select your active connection (Wi-Fi or Ethernet).
- Click Details (or Advanced) and go to the TCP/IP tab.
- Look for “Router” or “Default Gateway” – that’s your router’s IP.
Use Mobile Device Gateway Lookup
On Android:
- Go to Settings → Wi-Fi.
- Tap the connected TP-Link network.
- Look for Gateway or Router – that’s your IP address.
On iOS:
- Go to Settings → Wi-Fi.
- Tap the (i) icon next to your connected TP-Link WiFi.
- Look at the Router field.
Alternative Domain: tplinkwifi.net
If you prefer not to remember IP addresses, many TP-Link routers support:
- http://tplinkwifi.net
How to Reset Your TP-Link Router
If you change your admin login or WiFi password and do not remember it, you will not be able to access the TP-Link login page with your credentials. The only remaining option in such an instance is to reset the router to factory settings.
The Location of the Reset Button
The majority of TP-Link devices have a mini RESET or RESET/WPS button:
- Typically located at the back or the bottom of the router.
- Dipped frequently in a small hole to avoid unexpected presses.
To press it, you will need a paper clip, a SIM removal tool, or a pin.
How Long to Press It
- Ensure your TP-Link router is turned on.
- Place the pin in the reset hole, then press and hold the button.
- Hold it for 10- 15 seconds, or until:
- The LED lights start flashing, or
- The router restarts
- The LED lights start flashing, or
Upon rebooting the router, it will revert to factory-default settings.
What Gets Erased After Reset
A factory reset wipes all custom configuration, including:
- Custom WiFi name (SSID)
- WiFi password
- Admin username and password
- Parental controls & guest networks
- Special settings used in TP Link Piso WiFi or similar hotspot setups
- Port forwarding, bandwidth control, firewall rules, etc.
In other words, your router will behave precisely the same as it did when you first bought it.
Logging In Again with Default Credentials
After the reset:
- Connect to the default TP-Link WiFi shown on the router’s label or use a LAN cable.
- Open a browser and go to the default IP (e.g., 192.168.0.1) or tplinkwifi.net.
- Use the default username and password, usually:
- Username: admin
- Password: admin
- Username: admin
You can now log in again and start fresh.
Post-Reset security Recommendations
Once you’re back in the admin panel, it’s essential to secure your network:
- Change the admin password
- Never leave it as admin/admin. Use something strong and unique.
- Never leave it as admin/admin. Use something strong and unique.
- Update your WiFi password.
- Set a secure password with a mix of letters, numbers, and symbols.
- Set a secure password with a mix of letters, numbers, and symbols.
- Disable remote management (if you don’t need it)
- This prevents anyone outside your local network from accessing the router.
- This prevents anyone outside your local network from accessing the router.
- Turn on WPA2 or WPA3 (if supported)
- This strengthens your wireless encryption and protects your TP-Link WiFi.
- This strengthens your wireless encryption and protects your TP-Link WiFi.
- Reconfigure TP Link Piso WiFi or other special modes
If you previously configured special captive portals or coin-operated WiFi settings, set them up again following your original instructions.
How to Change the TP-Link Wi-Fi Name (SSID)
Here’s why you shouldn’t keep the default WiFi name:
Security
Default SSIDs can reveal your router brand and sometimes model. Attackers can use this information to try known vulnerabilities or default passwords.
Easy Identification
In apartment buildings or busy areas, you’ll see many WiFi names. A unique SSID helps you quickly identify your TP-Link WiFi.
Professional/Branding Use
For businesses, cafés, or TP Link Piso WiFi hotspots, a custom SSID helps with branding and customer trust.
Step-by-Step Guide to Change SSID
Log in to the TP-Link admin page
- Connect to your router via WiFi or LAN.
- Open your browser and type 192.168.0.1, 192.168.1.1, or tplinkwifi.net.
- Enter your username and password (admin/admin or your custom login).
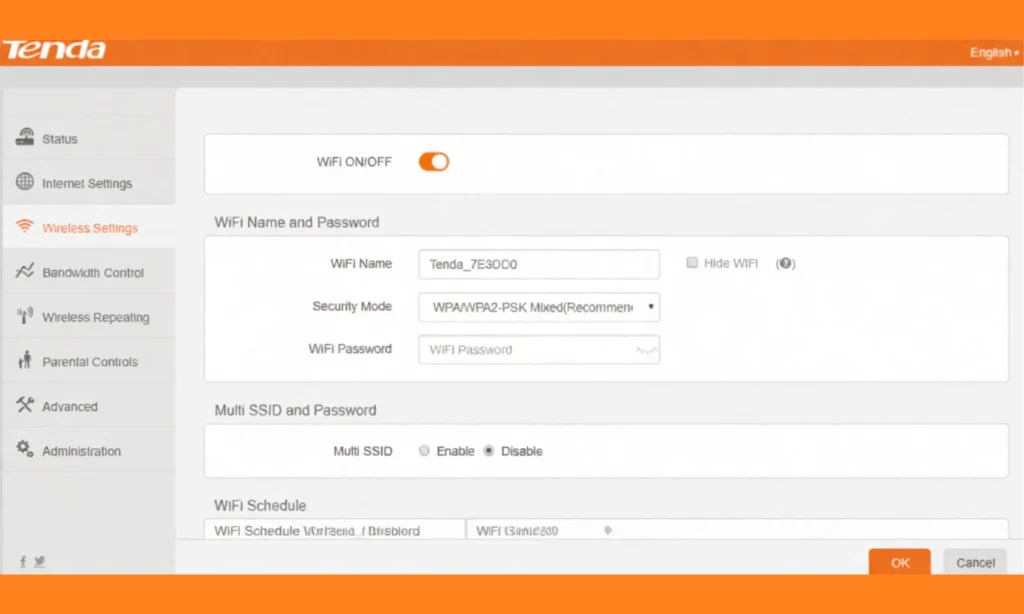
Go to Wireless Settings
- On many models, this is under:
- Basic → Wireless
- or Wireless → Wireless Settings
- Basic → Wireless
- If you’re using a dual-band router (2.4 GHz and 5 GHz), you may see separate settings for each band.
Find the SSID (Network Name) field.
- Look for fields labelled SSID, Network Name, or Wireless Name.
- You may see:
- SSID 1 (2.4 GHz)
- SSID 2 (5 GHz)
- SSID 1 (2.4 GHz)
Enter your new WiFi name
- Choose something unique but not too personal (avoid full names or phone numbers).
- For business or Piso WiFi-style setups, use a brand name or a hotspot name.
Save or Apply Changes
- Click Save, Apply, or OK (depending on your model).
- Your router may restart or briefly disconnect from WiFi while saving changes.
Reconnecting Devices After the SSID Change
After you change the WiFi name:
- All your devices will see the old network name as unavailable.
- Look for your new SSID in the list of available WiFi networks.
- Select it, then enter your Wi-Fi password (the password stays the same unless you change it).
If you’re doing both a TP Link password change and SSID change at the same time, remember.
How to Change the TP-Link Wi-Fi Password
One of the best ideas to enhance the security of your network is to update your TP-Link Wi-Fi password. Nevertheless, if your WiFi connection is sluggish, there are too many devices connected, or you know someone is using your WiFi network without your consent, changing the password on your TP-Link router can help solve these problems in real time.
That is why you should not use the default WiFi password:
- Helps to avoid unauthorised access: The default passwords are well-known. Anyone close to your network can connect without difficulty.
- Increases device speed: Removing unknown users will free up bandwidth.
- Secures your information: All your devices transfer information on your Wi-Fi. An effective password keeps the intruders at bay.
- Enhances the security of the administration: Using TP-Link Piso WiFi by the user improves bandwidth and session control security.
Step-by-Step Guide to Change Your TP-Link WiFi Password
Follow these steps to perform a password update using the TP Link login page:
Step 1: Log In to the TP-Link Router Dashboard
- Open your browser and enter one of the following:
- 192.168.0.1
- tplinkwifi.net
- 192.168.0.1
- Enter your admin username and password.
If you mistype anything like http 192.168 o 1.1 admin tp link or 192.168 l l tp link login net, the page won’t load! Make sure you type the correct format.
Step 2: Go to Wireless security
Once you’re inside the dashboard:
- Select Wireless
- Then select Wireless security.
Step 3: Update Your WiFi Password
Look for fields labelled:
- Wireless Password
- Passphrase
- Pre-Shared Key
Enter your new password.
Password Tips:
- At least 8–12 characters
- Mix of uppercase letters, lowercase letters, numbers, symbols
- Avoid names, birthdays, or predictable words.
Step 4: Choose WPA/WPA2/WPA3 security
To secure your TP Link router, select:
- WPA2-PSK (recommended for most users)
- WPA3 (if supported by your router)
Step 5: Save & Reboot
Click Save or Apply.
Complete Guide to Setting Up a New TP-Link Router
If you’ve just purchased a new router or reset an old one, follow these steps to configure your TP-Link router from scratch.
Unboxing & Physical Setup
Inside the box, you will typically find:
- TP-Link router
- Power adapter
- Ethernet (LAN) cable
- Quick installation guide
Set the router on a flat, open surface where airflow isn’t blocked.
Connect to the Modem
Use the included Ethernet cable:
- Plug one end into your modem’s LAN port
- Plug the other end into the WAN or Internet port on the TP-Link router.
This enables your router to receive internet from your ISP.
Power Up the Router
Connect the power adapter and turn on the router using the power button (if available). Wait for the LED lights to stabilise.
Connect via LAN or Wi-Fi
To perform the initial setup:
- Use a LAN cable to connect your PC to any of the router’s LAN ports
- Or connect via WiFi using the default SSID printed on the router label.
Access the Setup Wizard
Open your browser and visit:
- 192.168.0.1
- or tplinkwifi.net
This launches the TP-Link Setup Wizard for easy configuration.
Select Internet Connection Type
Choose the correct option based on your ISP:
- Dynamic IP (DHCP): Most common for cable ISPs
- Static IP: Requires manual entry of IP details
- PPPoE: Very common in many Asian countries; requires ISP username/password
When using TP-Link Piso WiFi, selecting PPPoE is often essential, depending on the vendor’s setup.
Create Your WiFi Name & Strong Password
You will now choose:
- WiFi Name (SSID) — Make it unique
- WiFi Password — Use a strong password
If using dual-band routers (2.4 GHz & 5 GHz), set names for both networks.
Apply Settings & Reboot
Click Save, Apply, or Finish.
The router may reboot automatically.
WiFi Placement Tips for Stronger Signal
To improve speed and coverage:
- Position the router in the centre of your home
- Avoid corners, walls, metal objects, and closed cabinets.
- Keep the router elevated — on a table or shelf.
- Avoid interference from microwaves, TVs, and cordless phones.
- For large areas, consider adding a TP-Link extender or Deco mesh system.
Popular TP-Link Router Models and Their Specifications
Here’s an overview of popular TP-Link models used worldwide for home, office, gaming, and Piso WiFi networks.
Model | Wi-Fi Standard | Speed/Bandwidth | Key Features |
TL-WR840N | Wi-Fi 4 | 300 Mbps | Basic home use, stable signal, easy setup |
Archer C20 | Wi-Fi 5 | 750 Mbps | Dual-band, ideal for small homes |
Archer C50 | Wi-Fi 5 | 1200 Mbps | MU-MIMO, improved range |
Archer C60 | Wi-Fi 5 | 1350 Mbps | 5 antennas, strong mid-tier option |
Archer A6 / C6 | Wi-Fi 5 | 1200 Mbps | Gigabit ports, MU-MIMO |
Archer C80 | Wi-Fi 5 | 1900 Mbps | Smart Connect, Beamforming |
Archer AX10 | Wi-Fi 6 | AX1500 | OFDMA, long-range |
Archer AX20 | Wi-Fi 6 | AX1800 | Faster speeds, WPA3 |
Archer AX23 | Wi-Fi 6 | AX1800 | Energy-efficient, modern design |
Deco M4 / M5 | Mesh WiFi | AC1200 | Whole-home mesh coverage |
Deco AX1800 | Wi-Fi 6 Mesh | AX1800 | Stable mesh, WPA3 |
Deco AX3000 | Wi-Fi 6 Mesh | AX3000 | Seamless roaming, advanced quality of service |
TP-Link Wi-Fi 7 (BE7000) | Wi-Fi 7 | Multi-Gig | High-speed, advanced interference control |
If you’re running a large network, such as a TP-Link Piso WiFi business, mesh models like Deco M4 and Deco AX3000 offer stable, wide coverage with easy management.
Troubleshooting Common TP-Link Login & Wi-Fi Issues
Even the most trusted TP-Link routers can occasionally experience issues. Be it the fact that you are having difficulty connecting to the tplinkwifi.net login page, or you are having problems with your daily Wi-Fi connection
1. Inability to reach the TP-Link Login Page.
You cannot open the TP-Link login page for several reasons. The top problems are typing the IP address wrong (192.168 l l tp link login net) or not being connected to the TP-Link Wi-Fi network. In certain situations, your cache and cookies can block the login page or even the browser extensions you have installed.
To fix this problem:
- Please use the correct address: http://192.168.0.1.
- See what happens when using a different browser or device.
- Cleopatra, clear your cookies and your browser.
- Turn off VPN or mobile data when you are not using them.
2. Is linked to Wi-Fi but does not have an Internet connection.
It is normal for devices to indicate they are connected even though they are not connected to the internet. This usually occurs because of incorrect ISP configuration, bad or slack cables, or modem-related problems.
To resolve this issue:
- Reboot your router and your modem to reestablish the connection.
- Check all the cables to confirm that they are well connected.
- Install new router software via the administration interface.
- Contact your internet service provider in case the WAN light is off.
3. Slow Wi-Fi Speed
Common causes of poor Wi-Fi performance include overcrowded networks, incorrect router placement, or outdated firmware. When too many devices are linked, the speed will be reduced. On the same note, when the router is used in the corner or on the wall, the signal is impaired.
To improve speed:
- Switch off unused disconnects.
- Place the router in a central, open location at home.
- Switch the Wi-Fi channel to minimise interference.
- Use the TP-Link dashboard to update the firmware.
4. Wi-Fi Keeps Disconnecting
This is because frequent Wi-Fi drops can be caused by overheating the router, high levels of signal interference, or incorrect channel width settings. Poor ventilation can cause overheating, and appliances such as microwaves or TVs can be sources of interference.
To fix the disconnecting issues:
- Install the router in a well-ventilated area.
- Do not place a router near any other appliances that could cause interference.
- A reset is recommended if the problem persists despite troubleshooting.
5. Forgot Router Password
If you forget the user login password for your router, you will not have access to the admin dashboard. Luckily, it is a straightforward solution.
To regain access:
- On a hard reset, press the reset button for 10-15 seconds.
- Once the rest is complete, enter the system’s default access credentials: admin/admin.
TP-Link Extender Login Guide
If you’re using a WiFi extender, the login process is slightly different.
Why Extender Login Fails
- Not connected to extender WiFi (TP-Link_EXT)
- Mobile data interfering
- Using the wrong IP
Solutions
- Connect to TP-Link_EXT
- Open your main router dashboard and check the extender’s assigned IP
- Visit that IP to log in.
Alternatively, use the TP-Link Tether App for a more straightforward setup and management.
FAQs
What is the default TP-Link login IP?
The most common default IPs are 192.168.0.1, 192.168.1.1, or tplinkwifi.net.
How do I fix the TP-Link login page not loading?
Make sure you’re connected to the TP-Link WiFi and type the IP correctly — not 192.168 l l tp link login net.
How to update TP-Link firmware?
Go to System Tools → Firmware Upgrade in the dashboard, then follow the on-screen instructions.
How to check connected devices?
Log in to your dashboard → look for Device List or Connected Devices.
How to enable parental controls?
Go to Parental Controls under the Basic or Advanced menu and configure rules.
How to change Wi-Fi password?
Go to Wireless → Wireless security, then update your Wi-Fi password.
Why is TP-Link showing "No Internet"?
This usually means ISP issues, incorrect connection type, or modem problems.
How to reset the TP-Link router?
Press and hold the reset button for 10–15 seconds until the router restarts.
FINAL IDEAS
Managing your TP-Link router through the TP-Link login page gives you complete control over your network. From improving WiFi speed to securing your connection through password updates, everything becomes easier once you understand the dashboard.
Whether you’re optimising for home use, work, gaming, or even TP-Link Piso WiFi, proper setup ensures stronger performance, better coverage, and top-notch security.